Building Your Arena.
Building an arena can be a daunting thought…
There’s more than just what you see on the surface.


No one-horseshoe-fits-all...
The starting gate…
Building an arena can be a daunting thought, especially when it’s for your beloved horses – you want to make sure that you’re doing right by both them and your pocket. Unfortunately, there is no one-horseshoe-fits-all, nor are there any shortcuts when it comes to constructing an arena – so before you set off quicker than Frankie Dettori racing Enable, there’s a few things to consider first.
Some of the key things to factor in are; Size, Cost, Drainage and Surface. Planning your project first, right through to completion, and having these key components ready, can help the smooth running of construction and prevent costs from creeping up. Don’t worry though, whether you’re starting from square one or upgrading an old arena, you’ve already started in the right direction by being here reading this. So, pop the kettle on, grab a notepad and we’ll get started…
Size does matter…
Now, probably quite obviously, the size of your arena will impact the total cost – a small lunge pen is going to be significantly cheaper than a 40 x 60 metre arena. When deciding on the size, consider the following;
Your land and current structures may affect where you choose to build – consider building in a previously constructed barn, or perhaps higher up a hill so as to help drainage, do you possibly already have a (even partially) levelled area as this would reduce slightly on the excavating.
The use of the arena once completed – are beginners/amateur level riders going to be the main users and therefore a smaller arena would fit the purpose, or do you require competition size to accommodate more advanced riders.
Your access to the site – if you have plans for a big arena yet only limited access, this will not only add to the time the process takes, but to the overall cost too.
Money makes the world go round…
Cost is a major factor and knowing your budget will significantly impact your entire project. Once you start to add up the costs you may find yourself starting back at step one a couple times, revaluating parts of your project with a little trial and error. This is why pre-planning is crucial…otherwise you may end up with a half build arena with no pocket money left and having to sell all your ‘matchy-matchy’ sets to try complete it – heaven forbid! Don’t be disheartened or try rush this step, as working back through and adapting the project is a good sign that you’re onto the right track.
As mentioned, remember to consider your access to the area. If you’ve limited access then suppliers will struggle to use their normal delivery vehicles and building machinery, meaning smaller loads in more frequent trips. Having to use smaller machinery to complete the arena will not only delay the process, but add to the cost significantly.
We often recommend to our customers with poor access to ask neighbouring farmers (or similar) if they can act as a safe drop off point. Farms often have great access for larger vehicles which will give you the cost reducing benefits of having your supplies dropped off in larger quantities, they also often have the lifting equipment to help offload and transport it to site. Although farmers are busy people and so are likely to charge for this however, it will still significantly reduce your time and money than using smaller vehicles with more trips.
We want an arena, not a swimming pool (although that would be nice too!) …
Your drainage system is paramount to the integrity of the structure of your entire arena, trying to drain away water without eroding the surfaces is a delicate procedure and without a sufficient system for this you also can’t guarantee an ‘all-weather’ surface. We strongly advise that you contact your local authority who can guide you as to where you can and can’t allow your drainage to vacate to.
There are differing drainage systems and the one you use will be primarily based on what your surrounding area is like and what your arena purpose is. Any drainage system you use will follow the same construct of having collecting drains feeding a larger drain, this will in-turn carry the water away into a ditch or stream. The most common drainage system used in all-weather arenas is the ‘Herringbone Pattern’. This drainage system comprises of a perforated main drain running central of the arena with other, perforated but slightly smaller, drains branching off to either side. These drains should have a slight natural flow, be placed in a trench that is double the depth of the drain and then wrapped in a woven geotextile membrane – inadequately protected drains will quickly clog and fail, so this will help prevent anything other than water going into the drainage system.
Your arena should be pitched so that it only has to deal with rainfall/water from above (no water should be flowing from a higher part of ground and into the arena) and should be able to allow the water to flow gently and evenly away – if you can place your arena on higher ground, you will already be at an advantage for this.
Don’t forget to allow for water to drain when it comes to your kick-boards. The outer edge of your arena will likely get the most use, the last thing you want is water pooling in this area and unable to flow out – this will only increase your risk of damaging not only your surface, but the sub-layers too.

There’s more than just what you see on the surface…
Ok, so surface technically comes into arena building more than once, you have your riding surfaces (which is where we come into play – we’ll cover this part a little later on), but you also have your land surface and it’s imperative to know what is best to put down on this to provide the greatest stability. This is the part in which you’re going to want to invest the most money, it may be tempting to cut back on the parts you ultimately won’t see, but the base-layers are crucial to the survival of your arena, so don’t scrimp on this part or it could cost you substantially in the future.
Varying from county to county, the land you’re on will have many hidden elements beneath it; finding out whether you’re about to try build on top of shale, clay or so on is the first step.
Map out and clear the area of any types of trees, plants or debris so that the land is ready to be built on. When excavating, you will find you have a large quantity of topsoil which can be costly to dispose of, consider spreading this around your surrounding fields or alternatively, you could perhaps create a mound around the outer edge of the arena for extra wind shelter or a viewing point (just be sure to not block drains or cause water flow into the arena if doing so). After the drainage you will have your upper sub-base, this should comprise of small stones/gravel which must be levelled and rolled/compacted so that it becomes stable and interlocked (be sure to select material that is less likely to swell and shrink with temperature changes). This sub-base layer wants to be at least 15cm (6 inches) in depth. Larger stones/bricks should not be used for this as they cannot interlock as well and will ultimately cause movement on the top surface. Ask that the stones/gravel is washed and free of dirt before putting it down to prevent it clogging your drainage right from the get go.
A Non-Woven Geo Textile membrane sheet should then be placed on top of the gravel – this will act as a barrier between the base and your surface and will aid the drainage. This is now standard practice in line with the Environmental Agencies new RPS 248.
The final furlong…
The final part of constructing your arena is the top surface and the first question you need to ask yourself is;
“What will I be using my arena for?”
You need to ensure that your arena surface will suit your needs, be it showjumping, dressage, polo etc. Showjumping is a demanding sport so your surface will need to provide more impact absorbing qualities, whereas with dressage you will need more firmness, and a multi-discipline surface needs to be hard wearing and adaptable – you need a surface that will always perform for you, no matter your discipline.
Have a surface that is too hard and you increase the risk of causing impact-shock injuries, too soft of a surface and you risk overstretching muscles and tendons to the point of injury also. Just think of how strenuous it is to run on soft sand and the ache in your legs afterwards.
Not only should the ideal surface provide good support, traction and consistency, it also ideally won’t kick dust up similar to riding in the Sahara, nor would it lose half the surface in the slightest wind. With Foley’s Equestrian Surfaces you have all these benefits along with the added benefits of being an all-weather riding surface (it doesn’t freeze in winter, nor does it become hard in drier months), all at a reasonable cost and also, what we believe to be, the best arena surfacing!
Beneath the top layer, you want a denser layer – this will prevent the horses churning through the surface and down to the base, ultimately causing the failure of the arena. If you can easily dig down to the membrane with your own heel, then this is a good indicator that the bottom layer isn’t firm enough.
All of Foley’s Equestrian Surfaces can be used as a full standalone surface on top of the membrane, or as a topper to another surface such as Silica Sand (our Eco-Sports Mix is also a great alternative to a sand base due to its’ density and better drainage qualities).
Recommendations;
The ideal overall riding depth is 6 inches
A full standalone fibre surface at 6 inches
A half and half mix of 3 inches Eco-Sports Mix/Silica Sand, topped with 3 inches of surface.
Always be sure to check the surfacing before it’s applied (although, if it’s Foley’s Equestrian Surfaces then we can rest assure that it’ll be perfect anyway!)
The results are in…
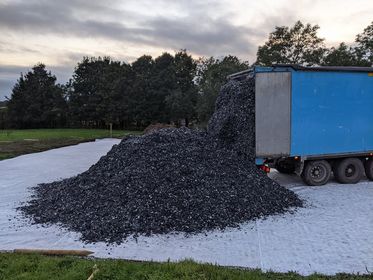
Pictured below is an example of a 20 x 40 full standalone with our Eco-Flex surface at 6 inches;

Longevity…
After all that time, money and probably stress, you want to protect the longevity of your arena with proper care and maintenance.
Show it some leeway, don’t use it straight after a heavy rainfall, allow some water to drain away first or you risk damaging the surface, membrane and drainage.
Manure pick. You know how quickly you see your money disappear from the horses’ mouth to, well, the other end…? Well, you want to pick up the manure just as quickly otherwise this can damage the soil of your structure and clog the drains.
Harrow the surface and allow it to remain level. The outer edge of an arena will most commonly begin to track quicker than the middle due to its more frequent use, leaving this track to get deeper and deeper will only increase the risk of reaching the membrane and causing it to become damaged. (Luckily, all of our fibre surfaces have minimal movement so this step will need doing less than say with a sand surface).
In the heat of the drier months, a light sprinkle of water can help prevent your surface getting too dry.
Remember, building an arena should be more like Grand National oppose to a 5-furlong race, take the correct steps and time now, and you will have a well-built arena that will last for years to come.

We are very proud to be accredited by Carpet Recycling UK which recognises the quality and process for our products.
Contact Info
- The Old School House, Snipe St, Redcar, Cleveland, TS10 5FN
- 01642 989 441
- sales@foleysequestrian.co.uk
Newsletter
Never miss a hoofbeat! Join our mailing list to keep you up to date with the latest news, event reports, articles, training tips, horse health news, and more.
Company registered address: Lorton Road, Redcar, England, TS10 4LY
© 2020 All rights Reserved. Company number 12320829.